


This year, to me, feels like the age of mega transition. One of the most humbling periods of my 20s, yet also one of the most intriguing. The journey itself is another story, but somewhere in the middle of all the shifts, I finally had the space (or excuse) to re-evaluate what I want to do creatively. Lots of ideas were drafted in my brown leather notebook, and among them was this DIY project.
The seed was planted last year at KD Darkroom in Taipei. I’d brought in my Super 8 after it stopped working in the desert of Uluru. I’ve always loved shooting and experimenting with film, something that carries both excite-ment and fear. There were times when things went wrong, when an entire roll came back blank. Over time, I’ve learnt to refine my process, and more importantly, to accept what is. To look not only with my eyes, but with my heart. I might have forgotten the images I lost, but I still remember the heat on my skin. The owner and I ended up spending the afternoon chatting and exploring his large-format camera. (and took home the lovely color portrait!) It felt different from my experience with 8mm and 35mm. Being able to develop a single sheet right after shooting, rather than waiting through a whole roll, was refreshing. Already-built large-format setups, though, are more bulky and costly, so I knew diving into this could be a new challenge!
With a long enough cable release, a rain jacket as the black cloth, and a phone set to record to be able to check focus on my own, I did my first home shoots using Ilford HP5+. B&W is simpler to develop and more forgiving. Shooting for years but always having the rolls sent to labs, I didn’t know I would find the changing bag process to be so much fun. What an invention! Feeling the shapes and textures, finding the notches, and that rush of “is this going to work?” Diluting, mixing, and then agitating in the bathroom, I followed the timer’s rhythm. Once the last chem-ical drained, the contrast appeared - clear, dark, and alive. I still can’t find the right word to describe that special moment, but it reminded me of why I fell in love with film in the first place.
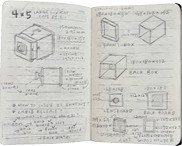
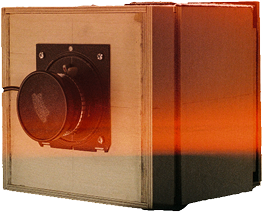
With a sketch in hand, I started researching and decid-ed to design the camera structure as a sliding box instead of the common bellows setup, thinking it’d be simpler as a building first-timer. Reading, as usual, filters out and fills in ideas for me in a big way. Two of the 8x10 articles inspired my design, but for portability and future project plans, I chose to go with 4x5, figuring we could always en-large prints later.
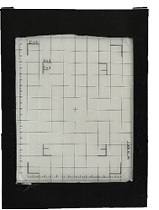
It was a windy morning when I finished calculating the dimensions outside Alley Tunes, the record store slash cof-fee shop near home. It reminded me of those 10 am math exams in high school, except I had a large latte and vinyl tunes as company.


The design came down to two main parts:
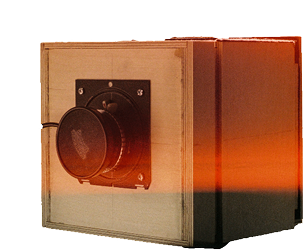
1. Front box + Lensboard + Lens
The front box is designed to be adjustable for focal length and to hold the lens. A framed front edge was added to match the back box. Though the Schneider 150mm f/5.6 Symmar was sometimes described as a standard and non-standout lens, its reliability and sharpness at a reasonable price were exactly what I needed. I sourced one in amazing condition from Japan.
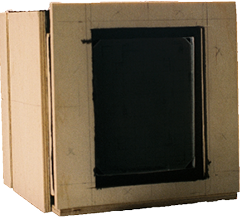
2. Back box + Backboard + Holder Slot
Slightly larger to fit the other box, the back box serves as the main body. I designed a u-slot film compartment to load standard holders. This part of the design is a push-and-pull balance between leaving enough space and being tight enough to avoid light leaks.


In this era of virtualization, hand-building to me felt like a grounding ritual. The tactile moments: physical touch, store runs, paint stains, the click of the shutter, and the smell of the fixer. The logic of the camera is simple, but the process, from design to completion, was big to me. Somehow, it encouraged me more than I expected. Unlocking and discovering the unknown is both scary and beautiful. Though the camera is already fully functional, I’m planning to add a handle for easier sliding and a base plate for tripod mounting, can’t wait to capture all the cool people and moments around :)


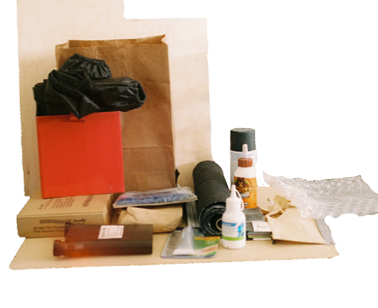
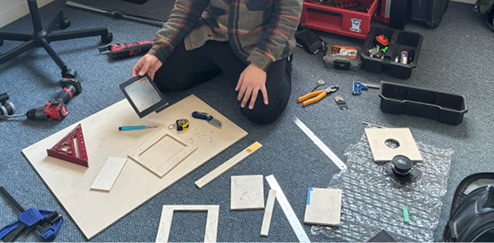
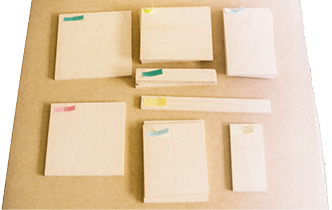

Plywood was the day-one material choice. I’ve adored it in designing - its aesthetic and durability. Despite the camera body cutting part being the most worrying, girl lucked out when the wood store was running a cam-paign which allowed me to scale down larger pieces. While waiting for certain cuts, I started on the hold-ers. The matte board’s thickness was trickier than expected. As Dre L Hudson mentioned in her article, it’s indeed the most time-con-suming part of the build. The ground glass holder turned out well, but I eventually substituted my film holder with Fidelity Deluxe ones found on the marketplace. They hold two slides and are stur-dier anyway.
For the smaller cuts and drilling, my partner stepped in with his full Milwaukee tool kit. Without him, this stage would’ve been an endless restart. His advice on tools mattered. The precision went up and the cost went down. When sunny gaps appeared during the gloomy winter period in Melbourne, I spray-painted all the interiors in the parking lot. Paint, dry, repaint, wait, and with the glue, all the parts were assembled. My hands were sticky, and my heart was pumping. Since we didn’t have clamps big enough, the wall and the stacks of books came in handy. I enjoyed this time of ticking off my tasks and seeing the build get into shape. And also grateful that the small miscalculation didn’t affect the outcome. Even so, I wasn’t convinced it would actually work, logic aside.
(FRONT)
(BACK)